Long time ago...
actually only more than one year ago I got my copy of the core set of the Star Wars X-wing miniatures game and wrote a more or less I-hate-you-maybe-could-like-you post bzw. review about it.
That day I played three or four games, but only the first two scenarios of the Core Set book and only with the one X-wing and the two TIEs from that set.
I did not play again...
...until one week ago :)
A friend of mine has been collecting (more or less) the game and so far he has two models of the "basic" starships, namely the X-Wing, Y-Wing, A-Wing, the TIEs, advance TIE, interceptor and I think he also has some of the big ships, anyway, the point is, he has more models than the ones on the core set alone.
He has also been trying to get us to play the game. He actually managed to play a four people scenario (I was not there) and it seemed to be better than my experience so far.
Two weeks ago we were talking about free time (lack of), games and things and stuff and we find ourselves talking about X-wing and how disappointed I was with the game.
He has found a very nice campaign on the web, the Erasmus campaign at a web called themetalbikini.com although the original one is still being discussed at BoardGameGeek.
This campaign has revived my interest in the game. The idea behind is very elegant and remembers me of something I found once, long time ago when I was playing AT-43. Basically the idea is you start small and slowly build up the game.
The campaign has four scenarios and the first once is only 50 points each side, no named pilots, no bi ships, so basically Wave 1 fighters.
We did that one week ago. It was great !
The first mission resembles the scenario 3 from the core set. In the core set, the empire starships have to "read" some satellites, in the Erasmus mission the Rebels have to destroy two satellites which the empire fighters can "protect" (special action for the mission).
It was a blast !
You can find some pictures and a nice narrative on the blog that this friend of mine has just created to follow not only this game but also future games.
Yes, future games. We are going to keep playing :)
So far we have played the first and the second mission of this Erasmus campaign.
The second mission is kind of weird. There are like three versions around, the one in themetalbikini and when we looked it up in boardgamegeek the one there, which have been updated recently.
The apparent problem with this mission seems to be that it is very difficult for the Rebels to win. The idea is similar to the shuttle mission from the core set and have the same problems.
A shuttle starts on one side of the board and moves towards the other side at a maximum speed forwards of 2, so in more or less 5 to 6 rounds will be out of the board and in safety.
One force (Empire, for example) escorts the shuttle and deploy on the same side where the shuttle starts.
The opposing force (Rebels, for example) has to attack the shuttle and deploy on the border of the board towards the one the shuttle moves and they get there their reinforcements !!!
That is insane. For the defending player there is no motivation to finish off any attacking enemy fighter as immediately a new, fresh fighter will appear right in front of the shuttle.
I think this kind of North to South engagement with reinforcements is broken in design.
In my opinion a far better idea will be to make the attacking force to deploy not opposite to the shuttle but perpendicular to it, so instead of a North - South deployment, it will be a North-East (or North-West) deployment, with the opposing forces on 90° of each other. Of course, the attacking force should be limited to deploy closer to the middle line of the table, let say, in a range of plus, minus 2 from this line.
With this deployment, if the defending player manages to destroy a ship early in the game, the reinforcements will appear not in front of the shuttle but on one side, so the defending player should also consider to move the shuttle sideways and not only run forwards, but if this players destroys an attacking fighter later in the game, the reinforcement will appear behind, which sometimes can be a bad thing, but here means that the attacker will have to speed up to catch the shuttle.
We did not try this scenario, but I will not mind to do it.
The patch we used was to forbid the deployment of reinforcements below range 3 of the shuttle, but still, it does not feels right.
We are going to play the third mission next week. This mission is similar to the second mission of the core set, wherein Luke is trapped in the middle of the table with some hyperspace problem and has to survive some rounds and then escape.
The Erasmus mission actually has a named pilot of the Rebel Alliance in the middle of the board with some asteroids lying around who has to run away from the empire forces into safety (out board).
You would say that this is stupidly easy, just pick up the best pilot of an A-Wing and run like hell. Well, that will work for an isolated scenario, but this is a campaign, so you "win" this named pilot if he survives the scenario for the final mission of the campaign, which coincidentally is a full combat mission, so maybe your very fast rabbit is not the kind of guy you will like to have in a heavy fight and being a progressive campaign, he will be the only named pilot you will have there (except Vander if the Rebels also won the first mission and he didn't dye in the second, which is my case :C )
Anyway, I thought it will be a nice idea to re-evaluate my previous post concerning this game. It seems to be that with more ships and good scenarios (and maybe the proper opponent) it can be a lot of fun.
So far I am playing again and I just ordered some more miniatures, nothing big, a second core set (very nice deal, an X-wing and two TIEs plus all the rest for the same price than the three fighters per se) (yeah, I know, the special pilots are not there, but their cards are already available on the web, so how cares), a third X-wing, a Y-wing and two adv. TIEs, which is roughly 100 point per side (actually only 86 on the Rebel side, but still enough for me).
I decided to stick to the Wave 1 ships, get to know them, play some more scenarios, maybe design a campaign together with this friend of mine and how knows?, maybe I finish buying all the rest of the stuff. The models look awesome anyway.
By the way, if you have any ideas for a campaign, a scenario or maybe already done some of this or know a place where to find some nice ones, it will be great if you drop us a comment with the info :)
Saturday, February 15, 2014
Thursday, January 16, 2014
Star Trek Attack Wing - Unboxing
Last year I was, for sure, very brave and good, so Xmas time was full of nice presents for me :)
One of them was the core set of Stark Trek Attack Wing


One of them was the core set of Stark Trek Attack Wing

The game comes with three different ships, one for each initial faction on the game, the humans, the romulans and the klingons.
Five cardboards with all the tokens and movement templates are also in the box. I must said that I still did not play the game, only read the rules and listened to some podcasts about it, so I cannot give an opinion on the actual use of some of the tokens.

As you can see, the humans got three possible commanders for their starship whereas the klingons and romulans only two.

Also in the box is the ruler for range measurement, the dices, cards for the three factions and damage cards and the planet token, a huge piece of cardboard which could be great as Death Star for the X-Wing.

There has been already too much discussion on the web concerning the quality and merits of both games, this and the X-Wing. One of the main critics to this one being the poor quality of the models.
I have to say that I am forced to agree on this. The ones on X-Wing really look like painted miniatures, you know, with the shadows and dirt and this feeling that they are almost real. The ones in this game have a monochrome plastic color with some highlights in other colors, they really look like toy starships.
As I was taking a look to the components, a non-geek, non-gamer friend was present and when confronted with the two boxes, the Attack Wing and the X-Wing, there was no doubt which ones qualified as "toys" and which ones as "models". This friend of mine was scared about touching the ones from the X-Wing, they looked more delicate to handle :)
This will be my only critic concerning this game, because even if it is true that it is heavily based on X-Wing (no surprise here, Wizkids got the right for this particular game system and design from Fantasy Flight Games), they are really two different games.
Before I continue, I must again said that I barely played X-Wing and that I never played (yet) Attack Wing. However, from what I experienced on my few X-Wing games is that the game seems to be designed to involve several ships, and by several I mean two or three squadrons on each side, so we are talking about two imperial squadrons each one having two Tie Fighter and one advance Tie Fighter (like in Star Wars, the movie, when Darth Vader goes rebel hunting) and maybe one rebel squadron consisting of two X-Wing and one Y-Wing. Of course depending on the final points. My gaming groups was playing even four players games and seems to agree with this. Several ships are the scale of this game. Some people on the web also seem to support this idea.
Attack Wing includes not two but three factions with specific rules for it already on the rule book and the scale seems to be focused not on several ships but on one or maximum two ships per side. The included missions seem to reinforce this impression as they are based on sending crew members outside of the starship (away teams) to pursue the mission objectives. Also the crew aspect seems to be a heavy component of the game play. Again, not direct experience here, only my first impressions based on the rule book and what I was able to find on the web.
Hope to be able to find time to play soon to test the game. It looks very nice.
Tuesday, August 27, 2013
Norway - A road trip - Part II
I just decided to post the second part of the post even if it is not finished yet as it is already end of August and if I do not publish it now maybe I do not do it ever.
I will try to update this second part with the rest of the information as soon as I have the time to do so.
The camping places we visited were in general terms good to very good, with, of course, the usual small thing here and there. All of them were able to provide fresh water, electricity, cooking, shower and toilet facilities, however not all of them accepted cards as payment method, or were prepared for the deposition of waste water (both, the "grey" water and/or the septic tank) or had internet access.
I will try to update this second part with the rest of the information as soon as I have the time to do so.
Campings
We were having the intention to alternate resting at a camping place and on our own. It turned out that the possibility for the second was not so obvious without a more deep knowledge of the area than the one we were in possession of, basically a detailed map of the Lofoten Islands. We managed, however, to find a nice spot in one or two occasions.The camping places we visited were in general terms good to very good, with, of course, the usual small thing here and there. All of them were able to provide fresh water, electricity, cooking, shower and toilet facilities, however not all of them accepted cards as payment method, or were prepared for the deposition of waste water (both, the "grey" water and/or the septic tank) or had internet access.
- Lofoten Hammerstad Sjøhuscamping, located a few kilometres north of Svolvær, this camping was our first point of contact with Norwegian hospitality. The owner, a very nice guy called Kjell, was happy to help you with anything, from advise about fishing up to withdrawing cash from your credit card for you. The camping place is not so big, it is located down hill looking to a small and rocky beach, has a pier and it is very close to a bridge over the fjord waters were you can try your luck fishing (on the way back, with proper fishing rods, we got a nice codfish here). The entry to the camping area is well indicated but easy to pass by if you are driving to fast. We stayed here two different night, one on the way to Å i Lofoten, the other on the way back from there. The shower runs with 5 NOK coins, the only camping place we were which used this coin, the other were using 10 NOK, for 3 minutes. There two shower rooms and four toilet spaces on an annex to the cabin number 3, which is hill up from the place were the campers are parked. That is also the place to empty the septic water, so if your septic tank does not have wheels, you will need to heavy it up to there. To empty the grey water you will need to manoeuvre a bit with the camper, but is easy done. We did not use the washing machine but according to Mr. Kjell it was possible, we just need to go to him with the stuff and his wife will help us. Internet was available all over the place. A very nice place to stay on a trip to the Lofoten, we liked it, specially the cover kitchen with barbecue inside :) The price was 185 NOK per night with electricity, 145 NOK without electricity, plus an extra per person.
- Lyngær Lofoten Bobilcamping, easily the biggest camping place we stayed. According to the brochure we got it has space for around 200 campers. The people at the reception were very friendly, and able to communicate in German and English. As around 70% of their customers are from Germany, their German was obviously better than their English. Of course, this applies only to the Norwegian stuff, as a guy from Pakistan or India was also working there as well as a Spanish girl. The place overlooks the fjord, has a pier and owns a rowing boat which one it is possible to go fishing (we got nothing here, however). There are a lot of facilities here, empty of the grey water and septic tank is easily done at one service building, together with the refilling of fresh water. Another service building houses the washing and drying machines. Both service buildings have a kitchen, toilets and showers (10 NOK for I think 3 or 4 minutes). I can not remember for sure if the place was having internet available, but I think so.
Tuesday, July 16, 2013
Norway - A road trip - Part I
We just came back from holidays in Norway, a road trip which started in Romaniemi (Finland), went to the Lofoten Islands and ended back in Romaniemi. The trip was great, with some fantastic moments but also with some down moments. This is, more or less, the story :)
Background
We were two families with kids. One family was of
three members, two adults and a baby girl of 16 months of age; the other family
was of four members, two adults, a girl of 4 years and a boy of 2 years old.
Both ladies were happily pregnant.We rented two campers from the company Touring Cars
which has branches all over the Scandinavian countries. The reason to take the
campers on Romaniemi (Finland )
instead of directly on Norway
 At the end we travel 2108 km at an average speed of 62 km/h, which I think it is quite good.
Currency: Finland is in the Euro-zone and therefore uses Euro as currency. Norway and Sweden on the other hand still have their own national currencies. All the three countries take credit cards and even debit cards, but not everywhere. For example, in Norway, on Henningsvær, we were almost not able to buy dried codfish as the factory was not able to accept cards and we were having not enough cash and the absence of a cash machine (we were told that the closest one was in Svolvær, which was a few kilometres out of our way having passing that city already the previous day).
Gas bottles: the camper uses gas for heating, cooking and for the fridge if you are not plug to the electricity network in a camping area. Our one was equipped with two bottles of around 15 litres each. It is possible to buy gas bottles on any petrol station. However, the connection piece on the top of the bottle differs in each Scandinavian country, so our Finish camper required Finish gas bottles. I was a bit worried that we were going to run out of gas in the middle of Norway, but at the end, we arrived to Rovaniemi without having emptied even one of the two.
Mosquitoes: They say Finland is the country of the thousand lakes, better say the country of the million of mosquitoes. They manage to get inside of the camper even with all windows closed. We were only on Finland upon arrival and prior to our departure, so in total not more than two-three days, but it was enough for us to get devoured by the mosquitoes. Norway, having not so many lakes, but more running water and specially salt water fjords is basically mosquitoes free.
Reindeer: As with the mosquitoes, they are absent from Norway, at least from the Lofoten area, but plenty on the border area between Sweden and Finland. You will find them on the side of the road, walking, crossing or just looking to you. They are look tamed and quiet, but we did try to approach them, just took some pictures from the camper. Other drivers can flash you the lights to indicate you that you are going to find some reindeer on the road ahead of you.
Camper drivers: According to the guy in the rental agency, it is a common custom between the drivers of campers to greet each other on the road. I tried to do every time, but I will say that only three quarters answered, although I also have to say that I was not always the first one to initiate the greeting.
Road: The E10 which we followed is quite narrow. It has two lanes, one in each direction but there is no space on you right further than the lane. Once the lane finished there is a more or less abrupt drop in the terrain. You should picture the road as slightly elevated over the surrounding terrain, so if you drive out of the lane you will fall with the camper maybe a good meter in some places. The main road, E10, is pretty well maintained, however some irregularities and holes are to be expected, as well as the required maintenance works, which in one case, when we were driving towards Å i Lofoten were quite annoying as they were quite extensive and intensive.
I also wanted to talk a bit about the camping places and the places we visited and the activities and so on, but I will do in other posts, otherwise this post will be enormous and I will never finish and publish it.
Route
This here is a image capture of a google map with the relevant points on the trip. As stated, we arrived to Rovaniemi by plane, took the campers and cross into Sweden following the road to Pello (Finland) toward Narvik (Norway). Short of Narwik we went north into the Lofoten. At the Lofoten we visit some places that are not in this picture, but the main path is accurate. In Andenes we stop to take a boat to see the whales (more on that later) and cross towards Senja with the ferry (more on ferries later).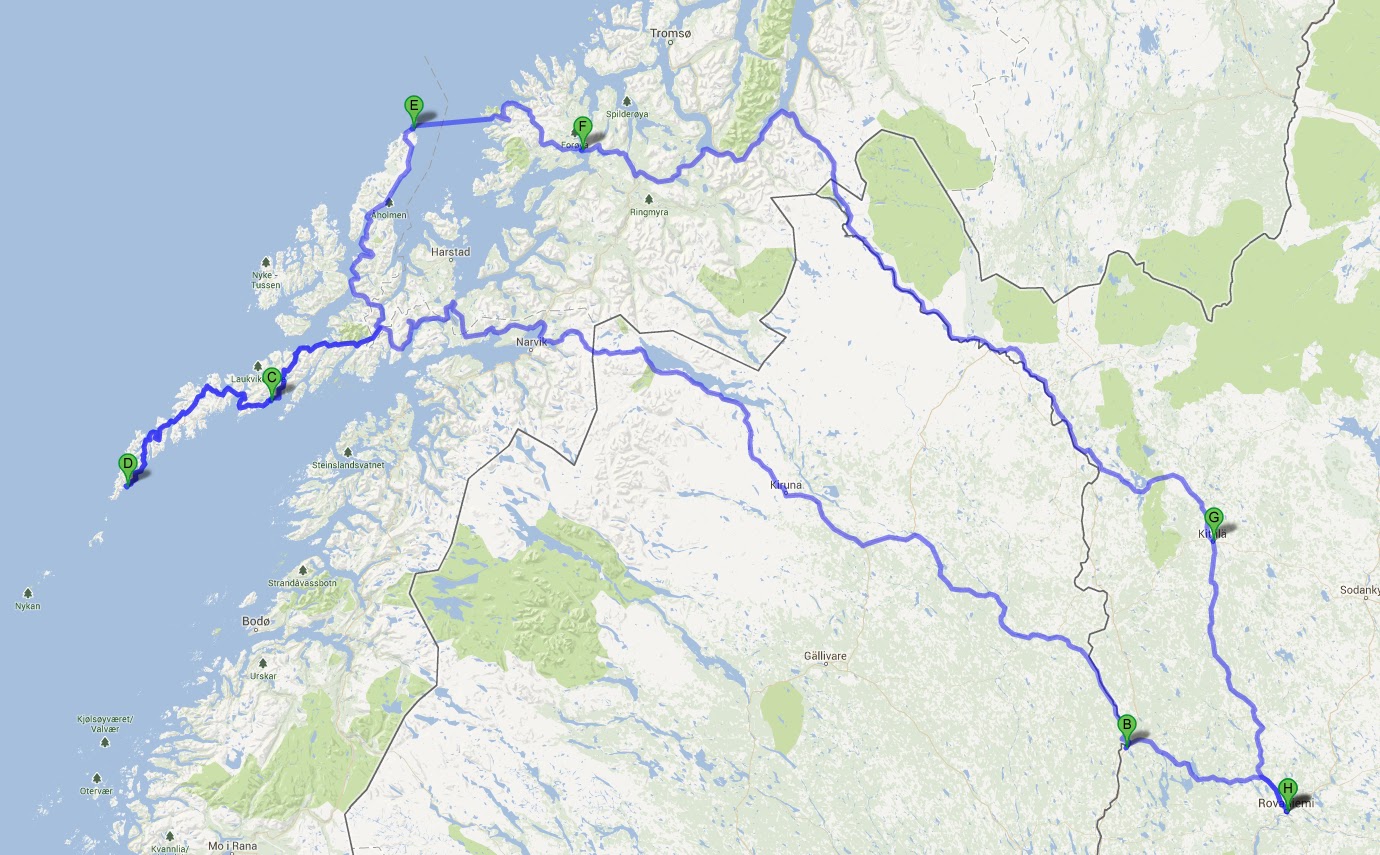
Practicalities
The Scandinavian countries share a lot of features, such as an amazing landscape, but also differ in a lot of small things which can make you live not so easy.Currency: Finland is in the Euro-zone and therefore uses Euro as currency. Norway and Sweden on the other hand still have their own national currencies. All the three countries take credit cards and even debit cards, but not everywhere. For example, in Norway, on Henningsvær, we were almost not able to buy dried codfish as the factory was not able to accept cards and we were having not enough cash and the absence of a cash machine (we were told that the closest one was in Svolvær, which was a few kilometres out of our way having passing that city already the previous day).
Gas bottles: the camper uses gas for heating, cooking and for the fridge if you are not plug to the electricity network in a camping area. Our one was equipped with two bottles of around 15 litres each. It is possible to buy gas bottles on any petrol station. However, the connection piece on the top of the bottle differs in each Scandinavian country, so our Finish camper required Finish gas bottles. I was a bit worried that we were going to run out of gas in the middle of Norway, but at the end, we arrived to Rovaniemi without having emptied even one of the two.
Mosquitoes: They say Finland is the country of the thousand lakes, better say the country of the million of mosquitoes. They manage to get inside of the camper even with all windows closed. We were only on Finland upon arrival and prior to our departure, so in total not more than two-three days, but it was enough for us to get devoured by the mosquitoes. Norway, having not so many lakes, but more running water and specially salt water fjords is basically mosquitoes free.
Reindeer: As with the mosquitoes, they are absent from Norway, at least from the Lofoten area, but plenty on the border area between Sweden and Finland. You will find them on the side of the road, walking, crossing or just looking to you. They are look tamed and quiet, but we did try to approach them, just took some pictures from the camper. Other drivers can flash you the lights to indicate you that you are going to find some reindeer on the road ahead of you.
Camper drivers: According to the guy in the rental agency, it is a common custom between the drivers of campers to greet each other on the road. I tried to do every time, but I will say that only three quarters answered, although I also have to say that I was not always the first one to initiate the greeting.
Road: The E10 which we followed is quite narrow. It has two lanes, one in each direction but there is no space on you right further than the lane. Once the lane finished there is a more or less abrupt drop in the terrain. You should picture the road as slightly elevated over the surrounding terrain, so if you drive out of the lane you will fall with the camper maybe a good meter in some places. The main road, E10, is pretty well maintained, however some irregularities and holes are to be expected, as well as the required maintenance works, which in one case, when we were driving towards Å i Lofoten were quite annoying as they were quite extensive and intensive.
I also wanted to talk a bit about the camping places and the places we visited and the activities and so on, but I will do in other posts, otherwise this post will be enormous and I will never finish and publish it.
Tuesday, May 21, 2013
Say "yes" in Vallejo
Probably I will expand later this post or maybe write another one about the topic and other related phonetic issues, buy for the moment I will try to keep this post short.
The Spanish proper name Vallejo, which happens to be also the name of a quite popular brand of paints is usually mispronounced by English speakers (also by German and Dutch, and in general any speaker of a Germanic language).
The word Vallejo has three syllables: Va-lle-jo
"Va" should be pronounced as the "ba" in Baltimore or in badminton
"lle" should be pronounced like the "ye" in yes and not as "le" in Lex (Luthor)
"jo" there is no close sound for this syllable in English, but people more or less got the idea from other Spanish words like "jamón" or "Jerez" (not only a kind of alcoholic stuff but also the city where it comes from)
The main issue of mispronunciation is on the "lle" syllable, so please don't say "le" in Vallejo, say "ye(s)".
Wednesday, April 24, 2013
Tau Sept Colours

Following my acquisition of the new Codex for the Tau Empire last weekend I am again in the mood of playing Warhammer 40K and more importantly of painting further my Tau army.
I have some models I got second hand and I just got 12 Fire Warriors more and a Hammerhead with removable and magnetized parts which looks very nice, it is almost assembled and not even primed.
My idea so far is to keep the models which are well painted as I will not be able to do such a good job even if they are either in the usual Tau light brown or in a kind of camo pattern based on grey and green (five metal Stealth suit models) and try to remove the paint from the others and choose a colour pattern myself. I am still not sure which colour combination I will prefer but for sure not Tau brown, maybe something like the urban colour schema that you can see in the new codex or in the White Dwarf issue 400.
However, one thing that is really important for the Tau, more that the colour schema of the armour is the Sept colour. This colour is present as geometric motives or lines on the armour and is common to all the Tau soldiers from a specific Sept, so it sounds like a good idea to have a list of the colour of each Sept so that you can know which one to use or to choose.
The new Codex includes the colours for some Septs but not for all of them, this is the list I was able to compile so far with the reference where to find the information, the names of the colours are Capitalized as on the source:
1st Sphere
- T'au - White Scar (White Dwarf issue 400); old codex (2006), page 59, Skull White
- Tau'n - new Codex (2013), page 87, dark grey
- D'yanoi - new Codex (2013), page 89,bright blue; old codex (2006), page 59, Ice Blue
- Bork'an - Sotek Green (White Dwarf issue 400); old codex (2006), page 59, Hawk Turquoise
- Dal'yth - no information available
- Fal'shia - new Codex (2013), page 89, unnamed colour, looks pale yellow
- Vior'la - old codex (2006), page 59, Blood Red
- Sa'cea - Troll slayer Orange (White Dwarf issue 400); old codex (2006), page 59, Fiery Orange
2nd Sphere
- Au'taal - new Codex (2013), page 89, bright green; old codex (2006), page 59, Scorpion Green (now Moot Green)
- N'dras - Abbadon Black (White Dwarf issue 400)
- Ke'lshan - new Codex (2013), page 89, yellow; old codex (2006), page 59, Golden Yellow
- Elsy'eir - no information available
- Tash'var - no information available
- Vash'ya - new Codex (2013), page 89, unnamed colour, looks lila or pale purple
- T'olku - new Codex (2013), page 89, unnamed colour, looks emerald green
3rd Sphere
- Ksi'm'yen - no information available
- Fi'rios - new Codex (2013), page 87, unnamed colour, looks very pale green-grey
Update:
from the link provided in the comments by anonymous:

Saturday, November 17, 2012
For the Great Good - Tau first two battles
In a previous post I told you about my new second hand Tau army, today I will speak about their two first battles or glorious defeats :)
The first one saw only infantry involved as we are trying to get the rules step by step. My opponent got a starter set and was having the Space Marines ready for the game. There were two squads, a big one with several Space Marines, one of them armed with a nasty heavy weapon and blast effect, and a second one of 5 guys in Terminator armour (2+ saves).
For the Tau I was fielding two Fire teams (each with 12 soldiers) and a 12 members Kroot unit.
We did not check for the balance of points as our intention was to try the rules and see how the game mechanics worked, winning or losing or any army points consideration were left aside. Although we were pretty sure that the Tau were "under pointed".
Anyway, we set up a table on the long, so that the Tau were pretty far away from the Space Marines and were able to enjoy the 30" range of the Pulse rifles, however the one Space Marine with the heavy weapon with range 36" also got some Kroots dead.
The good thing was my initial great rolling as the Tau Fire Teams managed to kill 3 of the 5 guys in Terminator army in the two first rounds of the game.
The Game, by the way, was decided to be played on 4 rounds, with a central primary objective worth 3 points and as secondary objective were First Blood (1 point) and Line Breaker (1 point).
All the Tau were in the back basically all the game shooting from the distance and trying to stop the guys in Terminator armour who were advancing towards the central primary objective. The rest of the Space Marine forces started the game in a corner inside a ruined building, out of their weapons range (except for the mentioned 36" heavy one) and were "tasted" by the Tau pulse rifles, but later moved carefully outside of the ruins and under cover of a chemical reactor and some walls tried to move towards the primary objective. The Tau were waiting for them and the first one that showed his ugly face from behind the chemical reactor is still looking for the insides of his skull on the battlefield. The rest just hunker down behind the cover and let the guys in the Terminator armour control the central objective.
The Tau were not able to get clear fire lines to the two surviving Terminator armour guys and were trying to maneuver into a better firing position, that leaded to the dead of more Kroots who actually managed to fail a Morale test and Fall Back out of the board and giving the Space Marine player the First Blood secondary objective.
At the end of round four, the guys in Terminator armour were still there, controlling the primary objective and not scared at all of the fire of the Pulse rifles.
The second battle was against an Ork army. This time we agreed on 500 points and at least a vehicle to try the rules further.
The Ork fielded a kind of open truck, a unit with three bikes, a heavy unit with three guys and a very impressive leader again in 2+ armour and a normal unit full of orks (a lot of them).
For the Tau I field a Hammerhead with the Rail Gun configuration, a five members stealth team, all of the with the Burst Cannon, a unit of 12 Kroots (they should have been 14 o 15 to be close to 500 points but I forgot to check the number of Kroot on my bag and I was short of points again...) and a team of 10 Fire warriors with Pulse rifles.
This time we used the long side of the table for deployment, so we were having only 4" to deploy and the central 24" as battle field.
Again I lost the roll to see who decided to start the game and I deployed first, which upon reading now again the rules should have made me the first one in activate my units but actually my opponent deployed after em and activate before me... Well, next time :)
Anyway, I deployed the Hammerhead in the left corner, behind a very low hill, the Fire team on the right corner, behind a slightly higher hill, the Kroot to the left of the Fire team, just behind a broken wall (forgot they were able to infiltrate...)
My opponent deployed the normal ork unit in front of the Fire team and the rest of his troops mainly on my left side, so in front of the Hammerhead.
I deployed the Stealth Team in the open, in front of a container, to the left of the Kroot and a bit deeper into the battlefield. I was counting on the 4+ save given by the stealth armour.
The battle field was having an impassable swamp in the centre of the table, some wall, a container of each deployment side (from the AT-43 game), a chemical reactor close to the hill on my right, the one with the Fire team and a ruined building also on that side, but on my opponent deployment zone.
Primary objective with 3 points was controlling the reactor, secondary objective again First Blood and Line Breaker.
This time we decided to have variable game length, so rolling on the 5th and 6th turns and ending on the 7th the latests.
The heavy orks started inside of the open truck which was also a transporter but it was not able to move more than 6" to be able to disembark the orks, so my opponent was a bit disappointed with that. Anyway the truck moved around the container on his deployment zone a disembark the heavy orks who moved closer to the central swamp. The bikers joined them there and the normal orks tried to approach the chemical reactor. As the frontal armour of the Hammerhead was impenetrable to their fire weapons nothing serious happen to it, however the stealth team in the open lost one member (bad roll in the save and good rolls in the attack)
The Fire team moved on top of the hill and fired upon the normal orks, the Kroots moved also to the left to have a good view of the same orks and fired also against them, together they kill enough to force a morale check, but they past it.
The stealth team jumped on top of the container and got one of the bikers but the hammerhead was not able to get any one of the heavy orks. As in the first game, those 2+ armours were a problem for the Tau.
In the next round, the ork bikers and the heavy orks killed two more stealth guys, the remaining Tau failed the morale test, and fall back and eventually left the field, again First Blood for my opponent,
The hammerhead was again not able to score any casualty to the enemy, but the Kroot and the Fire warrior finally decimated the ork unit, leaving only two guys to fall back. They managed, however in the next round to regroup with a double one (!!)
The biker managed to get close to the hammerhead and assault and destroy it with four penetrating hits.
After that I was ready to concede the game as no one of my troops was able to stop the heavy orks, but we play a turn more, wherein my Kroot moved to be able to fire a half range against the heavys but without any success.
The counter attack of the heavys killed enough Kroot to made them fall back and the bikers were able to approach the Fire team on the hill.
This time my opponent was convinced of the Tau defeat and we finish the game.
With only two games and a very imperfect knowledge of the rules I can not say a lot about the future performance of the Tau. I need to learn my army before I can talk or criticize it with any rigour, but one think is clear, I need to field people able to hit 2+ armour with a certain amount of dices To Hit. The Hammerhead has an Armour Piercing (AP) of 1 but it is "only" a Heavy 1 weapon, so basically you roll one dice against a unit of 4 heavys and will Hit one with a 3+ (Balistic Skill is 4 for the Hammerhead). This does not sound to me a too much, it is like flipping a coin. After that you need to Wound but the enemy can save (Cover, for example).
Reading the Tau codex I was thinking about the plasma rifle with AP 2, 24" range and rapid, which will roll two dice below 12", but for that I will need to field Crisis battlesuits.
Also the Stealth teams can field a Fusion Blaster, AP 1 and range 12".
Don't know yet, need to re-read the rules again and see what can be done.
Now, I see the Hammerhead as too short on To Hit dices but again, I still need to learn how my army works.
More soon....
Subscribe to:
Posts (Atom)